Description
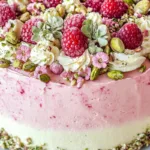
In the midst of life’s chaos, we often find comfort in simple pleasures, and what could be more delightful than stepping into your kitchen to create a Heavenly Delight: Irresistible Raspberry-Pistachio Cake Recipe? Imagine the warmth spreading through your home as the sweet scent of raspberries and roasted pistachios fill the air. This cake is not just a dessert; it’s an invitation to share moments with those you love. Whether it’s a cozy afternoon tea or a celebration worth remembering, this vibrant and beautiful cake speaks to the heart and soul, reminding us to savor each bite together.
Ingredients
- Pistachios – 120g, shelled and roughly chopped
- Sugar – 200g, plus extra for sprinkling
- Baking powder – 1 tsp
- Butter – 100g, melted
- Eggs – 3 large
- Vanilla extract – 1 tsp
- Plain flour – 150g
- Milk – 100ml
- Raspberries – 150g, fresh or frozen
- Pistachio nuts – 30g, to decorate
Instructions
Before diving into mixing, set your oven to 350°F (175°C). Preheating is crucial as it ensures your cake will bake evenly and rise beautifully. Take a moment to breathe in the excitement of creating something delicious.
Grab a 9-inch round cake pan and lightly grease it using butter or baking spray. Make sure every corner is covered to prevent sticking. If you’re feeling fancy, you can line the bottom with parchment paper for easy removal. This little step will pay off later when you present your cake.
In a mixing bowl, combine the all-purpose flour, baking powder, and a pinch of salt. Stir together with a whisk to ensure an even distribution of the leavening agent. This simple action prevents clumps in your cake batter, creating a silky texture that melts in your mouth.
In a separate bowl, beat your softened butter with granulated sugar using an electric mixer until the mixture turns light and fluffy. This can take about 3-5 minutes. The transformation is magical as air gets incorporated, which will result in a beautifully risen cake, so don’t rush through this step!
Next, crack in the eggs one at a time, mixing well after each addition. Pour in the vanilla extract for that lovely aroma. Your batter will come together beautifully at this stage, with a glossy finish that makes your heart flutter.
Gradually add the flour mixture into the wet ingredients, alternating with the milk. Use a spatula to fold in the ingredients gently. This step requires your patience; over-mixing can lead to a dense cake, which is not what we want.
Gently fold in fresh raspberries and chopped pistachios, creating bursts of color and crunch throughout your batter. This step is where the magic happens, as you can already imagine the delightful flavors intermingling.
Pour your batter into the prepared cake pan and smooth the top with a spatula. Place it in the oven and let it bake for 25-30 minutes. The aroma will waft through your kitchen, creating a tantalizing anticipation for what’s to come!
Once baked, allow the cake to cool in the pan for 10 minutes before transferring it to a wire rack. This will prevent it from getting soggy. Once cooled, it’s ready to be adorned with your favorite frosting or enjoyed plain for a light treat.
Notes
Tip 1: Fresh Ingredients Matter
Always use the freshest ingredients you can find. Ripe raspberries are sweeter and more flavorful, elevating your cake’s taste to new heights.
Tip 2: Store Properly
If there’s any cake left (though it might be hard to resist), store it in an airtight container at room temperature for up to three days. If you want to keep it longer, consider freezing it as individual slices.
Tip 3: Serving Suggestions
This cake pairs beautifully with a dollop of whipped cream or a scoop of vanilla ice cream. The textures and flavors complement each other perfectly for a decadent dessert experience.
- Prep Time: 15 minutes
- Cook Time: 30 minutes