Description
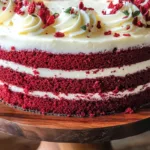
Life is filled with moments that deserve to be celebrated, and what better way to do so than with a slice of the Irresistible Perfect Red Velvet Cake Recipe? The rich, velvety texture and the vibrant red hue evoke feelings of love and joy, making it the perfect dessert for special occasions or simply a cozy gathering at home. Every bite carries the essence of warmth, comfort, and sweet memories, whether you’re sharing it with friends or savoring it in quiet solitude.
Ingredients
- All-purpose flour – 2 ½ cups
- Granulated sugar – 1 ½ cups
- Cocoa powder – 1 tablespoon
- Baking soda – 1 teaspoon
- Baking powder – 1 teaspoon
- Salt – ½ teaspoon
- Vegetable oil – 1 cup
- Buttermilk – 1 cup
- Eggs – 2 large
- Red food coloring – 2 tablespoons
- Vanilla extract – 1 teaspoon
- White vinegar – 1 teaspoon
Instructions
Begin your journey by preheating your oven to 350°F (175°C). This step is crucial as it ensures your cake bakes evenly, yielding that perfect texture you desire. While the oven warms, take a moment to prepare your baking pans. Grease them well, or better yet, line them with parchment paper for easy removal later.
In a mixing bowl, whisk together the flour, cocoa powder, baking soda, and salt. This simple action not only combines the ingredients but also aerates them. As you stir, envision the rich flavors melding together, setting the foundation for your delectable cake.
In another bowl, cream together the softened butter and sugar until light and fluffy. Use a hand mixer or stand mixer to make this process easier. As the mixture turns pale and airy, it’s a delightful reminder of how your cake will rise beautifully in the oven.
Next, incorporate the eggs, one at a time, and add in the vanilla extract. Beat well after each addition to ensure everything blends together seamlessly. This step enhances the flavors, making your cake even more scrumptious.
Now, it’s time for the buttermilk and red food coloring to shine. Alternate adding the dry mixture with the buttermilk, beginning and ending with the dry ingredients. Be cautious with the food coloring—add a little at a time until you achieve that gorgeous red hue. Stir gently until fully combined; you want to maintain that airy texture.
Once your batter is fully combined, evenly distribute it between the prepared pans. Slide them into the preheated oven and set a timer for about 25-30 minutes. Your kitchen will soon fill with the sweet aroma of baking cake—a truly delightful sensory experience.
After baking, allow the cakes to cool in their pans for about 10 minutes. This waiting period helps to firm them up a bit. Then, carefully flip them out onto wire racks to cool completely. Patience is key here; let them cool fully before frosting.
While your cakes cool, prepare your favorite cream cheese frosting. Once the cakes are completely cooled, generously spread the frosting between the cake layers first, then cover the top and sides. Don’t forget to get creative with decorations—sprinkles or chocolate shavings make for an enticing finish!
Notes
Baking Time Considerations
Keep an eye on your cakes as they bake. Ovens can vary in temperature, so start checking at the 25-minute mark to ensure they don’t overbake. A toothpick inserted into the center should come out clean when they’re done.
Chilling the Cakes
For easier frosting, consider chilling the cakes in the fridge for about 30 minutes. A slightly firm surface will make spreading the frosting a whole lot simpler and cleaner.
Storing Leftovers
If you’re fortunate enough to have some cake left over, store it in an airtight container at room temperature for up to three days. If longer storage is needed, refrigerate it for up to a week, always allowing it to come to room temperature before enjoying.
- Prep Time: 30 minutes
- Cook Time: 30 minutes