Description
Life can often feel like a whirlwind, but small moments of sweetness can ground us amidst the chaos. Imagine gathering with loved ones, sharing laughter, and indulging in something special, like a delicious slice of Irresistibly Creamy Blissful Protein Cheesecake. This recipe is not just a treat but a celebration of connection, joy, and the little victories we achieve every day. It’s the perfect blend of creamy goodness and protein-packed delight, allowing you to enjoy dessert guilt-free.
Ingredients
- 1 cup Greek yogurt (or dairy-free alternative)
- 1 cup cottage cheese (or dairy-free alternative)
- 1/4 cup protein powder (any flavor you prefer)
- 1/4 cup maple syrup (or other sweetener of choice)
- 1 tablespoon vanilla extract
- 1 teaspoon lemon juice
- 1/4 teaspoon salt
- 1/4 cup chocolate chips (optional)
Instructions
Start by grabbing a springform pan, which is essential for the perfect Creamy Protein Cheesecake. Lightly grease the bottom and sides with a little coconut oil or cooking spray to ensure easy release. This preparation will help you avoid any sticky situations when it’s time to unveil your cheesecake masterpiece.
Combine your preferred crust ingredients in a mixing bowl, choosing from options like crushed almonds, oats, or graham crackers. Mix these with melted coconut oil until the mixture resembles wet sand. Next, firmly press this crust mixture into the base of your springform pan. The key here is to pack it tightly to create a sturdy foundation for your Creamy Protein Cheesecake. Pop this crust into the refrigerator while you prepare the filling to let it set slightly.
In a high-speed blender or food processor, combine the main filling ingredients: your choice of cream cheese, yogurt, and protein powder. Blend until perfectly smooth and creamy, which will be the heart of your Creamy Protein Cheesecake. Don’t forget to scrape down the sides to ensure all ingredients are fully incorporated. The blending process should create a luscious texture that’s truly irresistible.
Now it’s time to add flavor! To the filling, incorporate your choice of sweetener, such as maple syrup or stevia, along with a splash of vanilla extract. Blend it all together once more, adjusting sweetness according to your taste. When done, you should have an incredibly creamy and delightful filling that promises to elevate your dessert to new heights.
Pour the creamy filling onto your prepared crust and smooth it out with a spatula. This is where the magic happens! Bake in a preheated oven until the edges are set but the center still jiggles slightly. This jiggle is a good sign of a perfectly baked Creamy Protein Cheesecake that will set beautifully once cooled.
After baking, allow your cheesecake to cool at room temperature for a bit before transferring it to the fridge. Let it chill for at least four hours, or overnight if you can resist. Chilling enhances the flavors and sets the cheesecake to the creamy consistency you’re aiming for. When ready to serve, gently release the springform pan and slice into generous portions.
Notes
Tip 1: Experiment with Flavors
Feel free to experiment with different extracts or mix in ingredients like cocoa powder or fruit puree for added flavors. The beauty of this Creamy Protein Cheesecake lies in its versatility.
Tip 2: Make it Ahead
Preparing this cheesecake the day before is an excellent strategy. It allows the flavors to meld beautifully, ensuring an even more delightful experience when serving.
Tip 3: Decoration Delight
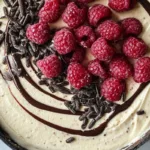
Want to impress? Top your finished Creamy Protein Cheesecake with fresh berries, a drizzle of dark chocolate, or a dollop of whipped cream for an impressive touch that’s sure to wow your guests.
- Prep Time: 15 minutes
- Cook Time: 0 minutes